Intro
These days, when you can buy a 7" tablet for $50, there is all the more reason for makers and hackers to want to become more engaged with up to the minute 7" touchscreen technology for their latest projects. Fortunately, recent developments in hardware have made this both affordable and easy to do - to the point where no project is too small, not have a neat touchscreen interface - and sound too!
Touchscreens are now flooding onto the market - at surprisingly low prices. 4.3", 5" and 7" devices are all available - with a 7" screen with capacitive touch for around $32.
Touchscreens have been generally difficult to drive in the past - requiring a high end microcontroller with sufficient RAM available to support a frame buffer - between 1Mbyte and 2 Mbyte. There is also the somewhat daunting process of writing a graphics library and the low level drivers needed to push all those pixels around.
This has previously been well out of reach for Arduino class microcontrollers - until recently - when an innovative, low cost family of display controller ICs appeared from a little known, fabless IC company, based in Glasgow, Scotland.
Their solution does not need a 2Mbyte frame buffer in RAM nor a high bandwidth memory bus. Instead their controller, or embedded video engine, uses a simple "Display List" to send lists of objects to display to the screen. This reduces the processing and memory requirements of the microcontroller by 2 or 3 orders of magnitude - which puts it nicely back into Arduino territory.
This post is all about using their lowcost (<$9) graphics co-processor IC to provide a neat user interface for any low-end microcontroller.
![]()
Character Building Stuff
One area of of development of my Neo-Retro computer that has been in a holding pattern for the last few months is the graphical user interface, or GUI. You may recall that over Christmas and New Year, I experimented with the FT812 graphics coprocessor device, normally intended for driving LCDs - but with a little bit of hardware bodgery (24 resistors) - it can be made to generate a VGA display for a widescreen monitor.
The FT812 is about $8.80 in 1 off quantities and requires very little other than a crystal and a few passives to generate the VGA output. It connects to the mcu via the SPI bus plus a couple of control signals.
It provides a neat and low cost means to get quality video output from even the most resource strapped microcontrollers eg Arduino/AVR, MSP430, Teensy etc.
If you can't Make - Simulate!
FTDI provide a simulator application (download for Windows) that allows you to develop GUI screens on a Windows PC. Very quickly you can build up the various graphical components and "widgets" into the display list (DL), that are typical on a modern LCD based product.
Once you have your display list and the right look, it's then relatively easy to import the DL into your own C code. For those using Arduino, Discovery F4, Raspberry Pi - there is technical support for this on the FTDI website.
Even a very modest microcontroller can support a Touchscreen GUI using this method, which can be used for LCDs in handheld equipment - or plugged into a large screen monitor for easier viewing.
LCDs are so cheap now - 7" screens with capacitive touch from China are selling for about $32. Or you can buy a ready made screen module 5" diagonal, 800 x 480 pixel resolution complete with FT810 controller, LCD and bezel for $33 or less - all ready to fit to your latest project.
Programming the FT81x
There are several font sizes available, graphics primitves such as lines and points (circles), buttons, sliders, shading effects, clocks, dials and audio samples and effects - which rapidly allow you to build up a full GUI. Both resistive and capacitive touchscreen technologies are supported - allowing for object selection, swiping, gesturing etc.
Indeed many of these features have been well explored in the GameDuino II product by James Bowman, - a complete retro-gaming platform using the FT8xx embedded video engine and an Arduino. Neither the FT81x datasheet nor Programmers' Guide do real justice to what this clever $8 IC can actually do. James Bowman's Book on GameDuino 2 describes the capabilities in much greater depth with graphical examples.
Now for some quick screen "experiments". All of these are achievable with a small microcontroller (MSP430, ATmega, ARM) connected via the SPI bus to an FT81x device. Suitable dev-boards are available from FTDI, with or without LCD, or the Gameduino 2 is FT800 hardware plus an I2C accelerometer and audio output jack conveniently brought out to Arduino shield compatible pins.
The first shows some 16 lines of text, a shaded background effect and 4 User Buttons. This can be quickly built up from a series of display list commands by the process of compositing.
The only downside of the FT81x is that you are limited to 2048 entries on the display list - and this means only about 2000 characters of text - as each character, with formatting occupies on average just over 1 entry in the display list. However, the screen above with 16 lines of source code and 4 buttons uses 32 for the background shading effect, 300 entries for the text and 228 for the buttons.
However, the whole point of a Graphical User Interface is that it uses graphics rather than just plain text to convey the information. A picture is worth a thousand words ... literally. And these days, most things can be conveyed in 140 characters or fewer.....
Dropping the screen effects and buttons results in just 325 entries. As the position of the character on the screen is encoded into it's display list entry, it may also be possible to code the text such that the whitespace takes up no space in the DL. So we can estimate roughly 512 DL entries per page of "reasonably dense" text - say 16 lines with an average line length of perhaps 32 characters.
This is a fairly efficient way to generate a screen. Whilst a single ASCII character takes 4 bytes sent to the display co-processor rather than 1 byte, this includes the X,Y position information and the choice of font. If raw bytes had to be sent to a frame buffer, it would take 8 bytes to build up an 8x8 character, and with a conventional serial terminal being sent ASCII characters - there would be no opportunity to choose to place them any position on the screen to a resolution of 1/16th pixel.
CLEAR(1, 1, 1)
CMD_TEXT(0, 0, 21, 0,"Dropping the screen effects and buttons results in just 325 entries.")
CMD_TEXT(0, 16, 21, 0,"As the position of the character on the screen is encoded into it's display")
CMD_TEXT(0, 32, 21, 0,"list entry, it may also be possible to code the text such that the whitespace")
CMD_TEXT(0, 47, 21, 0,"takes up no space in the DL. So we can estimate roughly 512 DL entries")
CMD_TEXT(0, 64, 21, 0,"per page of reasonably dense text - say 16 lines with an average line length")
CMD_TEXT(0, 80, 21, 0,"of perhaps 32 characters. "
CMD_TEXT(0, 112, 21, 0,"This is a fairly efficient way to generate a screen. Whilst a single ASCII")
CMD_TEXT(0, 128,21, 0,"haracter takes 4 bytes sent to the display co-processor rather than 1 byte,")
CMD_TEXT(0, 144, 21, 0,"this includes the X,Y position information and the choice of font. If raw bytes")
CMD_TEXT(0, 160, 21,0,"had to be sent to a frame buffer, it would take 8 bytes to build up an 8x8")
CMD_TEXT(0, 176,21, 0,"character, and with a conventional serial terminal being sent ASCII ")
CMD_TEXT(0, 192,21, 0,"characters - there would - there would be no opportunity to choose to place")
CMD_TEXT(0, 208, 21,0,"them any position on the screen to a resolution of 1/16th pixel.")
CMD_TEXT(0, 240, 21,0,"If we think of the Forth computer sending screen display list information over")
CMD_TEXT(0,256,21,0,"a UART connection to another machine (Laptop, Tablet, Phone, Ras-Pi, or")
The sequence of commands in the display list to produce the above screen. Whilst I have manually edited my text to fit into command format needed by the FT810 simulator - this process could easily be automated by the MSP430 - in Forth.
Further Thoughts
If we think of the Forth computer sending screen display list information over a UART connection to another machine (Laptop, Tablet, SmartPhone Ras-Pi, or CHIP) which then renders this information into a user display, then the complete DL of 2048 x 32bit words could be sent in approximately 89mS over a 921600 baud serial link. This would allow typing and editing of text in real time - for most humans.
The FT81x device provides on chip support for resistive or capacitive touchscreens - so that positional information of touches, swipes and gestures may be gathered. On a widescreen implementation, it would be a relatively simple method to create a mouse cursor - and use this for text highlighting, object selection, and invoking common user commands.
Forth is approaching 50 - and so it really is time to move away from purely text based input. The GUI can offer so much more including command mapping, colour, highlighting - plus perhaps some of the user interface features that the SmartPhone Generation (anyone under 8) will expect. The FT81x series of ICs offers a really cost effective means of achieving or at least experimenting with these ideas.
In the next part I will further some of the user interface ideas, in ways designed to minimise typing and maximise the features of the Forth Language.
As the SPI interface and control lines between the mcu and the FT812 is just 6 wires plus power, it's fairly easy to hook up to your favourite micro on a breadboard. Hopefully in a few days I will have the FT812 wired up to ChipStick and be able to generate these screens for real. I've been there already with Arduino based hardware - so now it's time for the MSP430 FRAM devices. 8 jumper wires and a LaunchPad should be all that's needed.
In the meantime - if you wish to experiment with the FTDI FT81x Display Simulator application - you can download it from here.
You may also be interested in the othe recent posts on ChipStick
ChipStick - A Diminutive Dev Board
The $5 Forth Computer
First Steps to Building the $5 Computer
Digital Dust
Constructional Guide
Bootloader
Interfacing Memory
I/O Expansion
Graphical User Interface
Applications
These days, when you can buy a 7" tablet for $50, there is all the more reason for makers and hackers to want to become more engaged with up to the minute 7" touchscreen technology for their latest projects. Fortunately, recent developments in hardware have made this both affordable and easy to do - to the point where no project is too small, not have a neat touchscreen interface - and sound too!
Touchscreens are now flooding onto the market - at surprisingly low prices. 4.3", 5" and 7" devices are all available - with a 7" screen with capacitive touch for around $32.
Touchscreens have been generally difficult to drive in the past - requiring a high end microcontroller with sufficient RAM available to support a frame buffer - between 1Mbyte and 2 Mbyte. There is also the somewhat daunting process of writing a graphics library and the low level drivers needed to push all those pixels around.
This has previously been well out of reach for Arduino class microcontrollers - until recently - when an innovative, low cost family of display controller ICs appeared from a little known, fabless IC company, based in Glasgow, Scotland.
Their solution does not need a 2Mbyte frame buffer in RAM nor a high bandwidth memory bus. Instead their controller, or embedded video engine, uses a simple "Display List" to send lists of objects to display to the screen. This reduces the processing and memory requirements of the microcontroller by 2 or 3 orders of magnitude - which puts it nicely back into Arduino territory.
This post is all about using their lowcost (<$9) graphics co-processor IC to provide a neat user interface for any low-end microcontroller.
 |
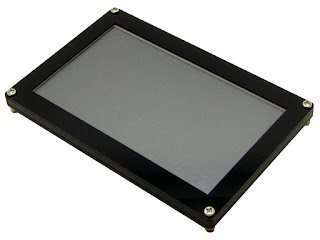
| Affordable 7" capacitive touchscreen - about $32 |

Character Building Stuff
 |
| Neo-Retro Computer - Interchangeable with £10 note. |
One area of of development of my Neo-Retro computer that has been in a holding pattern for the last few months is the graphical user interface, or GUI. You may recall that over Christmas and New Year, I experimented with the FT812 graphics coprocessor device, normally intended for driving LCDs - but with a little bit of hardware bodgery (24 resistors) - it can be made to generate a VGA display for a widescreen monitor.
The FT812 is about $8.80 in 1 off quantities and requires very little other than a crystal and a few passives to generate the VGA output. It connects to the mcu via the SPI bus plus a couple of control signals.
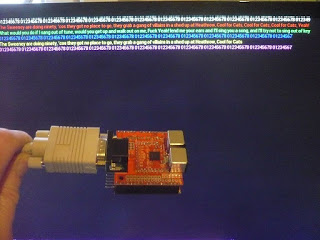 |
| 1024 x 768 colour text from the FT812 and ATmega1284 |
If you can't Make - Simulate!
FTDI provide a simulator application (download for Windows) that allows you to develop GUI screens on a Windows PC. Very quickly you can build up the various graphical components and "widgets" into the display list (DL), that are typical on a modern LCD based product.
Once you have your display list and the right look, it's then relatively easy to import the DL into your own C code. For those using Arduino, Discovery F4, Raspberry Pi - there is technical support for this on the FTDI website.
Even a very modest microcontroller can support a Touchscreen GUI using this method, which can be used for LCDs in handheld equipment - or plugged into a large screen monitor for easier viewing.
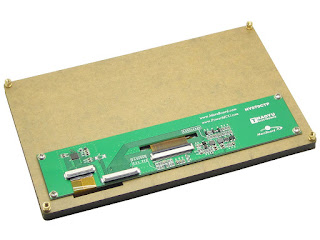
LCDs are so cheap now - 7" screens with capacitive touch from China are selling for about $32. Or you can buy a ready made screen module 5" diagonal, 800 x 480 pixel resolution complete with FT810 controller, LCD and bezel for $33 or less - all ready to fit to your latest project.
 |
| 800 x 480 Resolution with FT810 for about $33 |
 |
| Back of console showing various interface connectors |
Programming the FT81x
There are several font sizes available, graphics primitves such as lines and points (circles), buttons, sliders, shading effects, clocks, dials and audio samples and effects - which rapidly allow you to build up a full GUI. Both resistive and capacitive touchscreen technologies are supported - allowing for object selection, swiping, gesturing etc.
Indeed many of these features have been well explored in the GameDuino II product by James Bowman, - a complete retro-gaming platform using the FT8xx embedded video engine and an Arduino. Neither the FT81x datasheet nor Programmers' Guide do real justice to what this clever $8 IC can actually do. James Bowman's Book on GameDuino 2 describes the capabilities in much greater depth with graphical examples.
Now for some quick screen "experiments". All of these are achievable with a small microcontroller (MSP430, ATmega, ARM) connected via the SPI bus to an FT81x device. Suitable dev-boards are available from FTDI, with or without LCD, or the Gameduino 2 is FT800 hardware plus an I2C accelerometer and audio output jack conveniently brought out to Arduino shield compatible pins.
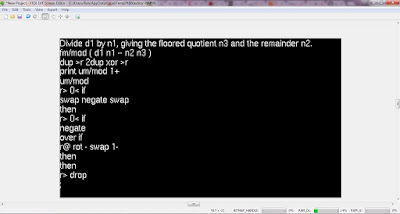
The first shows some 16 lines of text, a shaded background effect and 4 User Buttons. This can be quickly built up from a series of display list commands by the process of compositing.
 |
| A GUI aimed at displaying Forth Source Code - plus some User Buttons |
The only downside of the FT81x is that you are limited to 2048 entries on the display list - and this means only about 2000 characters of text - as each character, with formatting occupies on average just over 1 entry in the display list. However, the screen above with 16 lines of source code and 4 buttons uses 32 for the background shading effect, 300 entries for the text and 228 for the buttons.
However, the whole point of a Graphical User Interface is that it uses graphics rather than just plain text to convey the information. A picture is worth a thousand words ... literally. And these days, most things can be conveyed in 140 characters or fewer.....
 |
| Just the Forth source code |
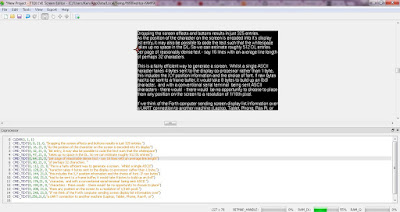
Dropping the screen effects and buttons results in just 325 entries. As the position of the character on the screen is encoded into it's display list entry, it may also be possible to code the text such that the whitespace takes up no space in the DL. So we can estimate roughly 512 DL entries per page of "reasonably dense" text - say 16 lines with an average line length of perhaps 32 characters.
This is a fairly efficient way to generate a screen. Whilst a single ASCII character takes 4 bytes sent to the display co-processor rather than 1 byte, this includes the X,Y position information and the choice of font. If raw bytes had to be sent to a frame buffer, it would take 8 bytes to build up an 8x8 character, and with a conventional serial terminal being sent ASCII characters - there would be no opportunity to choose to place them any position on the screen to a resolution of 1/16th pixel.
 |
| Fairly Dense Text and Display List 55% used |
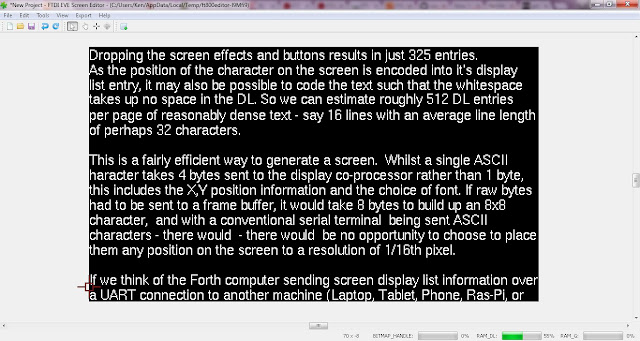 |
| Just the text: 1062 characters - encoded into 1130 entries in the DL |
CMD_TEXT(0, 0, 21, 0,"Dropping the screen effects and buttons results in just 325 entries.")
CMD_TEXT(0, 16, 21, 0,"As the position of the character on the screen is encoded into it's display")
CMD_TEXT(0, 32, 21, 0,"list entry, it may also be possible to code the text such that the whitespace")
CMD_TEXT(0, 47, 21, 0,"takes up no space in the DL. So we can estimate roughly 512 DL entries")
CMD_TEXT(0, 64, 21, 0,"per page of reasonably dense text - say 16 lines with an average line length")
CMD_TEXT(0, 80, 21, 0,"of perhaps 32 characters. "
CMD_TEXT(0, 112, 21, 0,"This is a fairly efficient way to generate a screen. Whilst a single ASCII")
CMD_TEXT(0, 128,21, 0,"haracter takes 4 bytes sent to the display co-processor rather than 1 byte,")
CMD_TEXT(0, 144, 21, 0,"this includes the X,Y position information and the choice of font. If raw bytes")
CMD_TEXT(0, 160, 21,0,"had to be sent to a frame buffer, it would take 8 bytes to build up an 8x8")
CMD_TEXT(0, 176,21, 0,"character, and with a conventional serial terminal being sent ASCII ")
CMD_TEXT(0, 192,21, 0,"characters - there would - there would be no opportunity to choose to place")
CMD_TEXT(0, 208, 21,0,"them any position on the screen to a resolution of 1/16th pixel.")
CMD_TEXT(0, 240, 21,0,"If we think of the Forth computer sending screen display list information over")
CMD_TEXT(0,256,21,0,"a UART connection to another machine (Laptop, Tablet, Phone, Ras-Pi, or")
The sequence of commands in the display list to produce the above screen. Whilst I have manually edited my text to fit into command format needed by the FT810 simulator - this process could easily be automated by the MSP430 - in Forth.
Further Thoughts
If we think of the Forth computer sending screen display list information over a UART connection to another machine (Laptop, Tablet, SmartPhone Ras-Pi, or CHIP) which then renders this information into a user display, then the complete DL of 2048 x 32bit words could be sent in approximately 89mS over a 921600 baud serial link. This would allow typing and editing of text in real time - for most humans.
The FT81x device provides on chip support for resistive or capacitive touchscreens - so that positional information of touches, swipes and gestures may be gathered. On a widescreen implementation, it would be a relatively simple method to create a mouse cursor - and use this for text highlighting, object selection, and invoking common user commands.
Forth is approaching 50 - and so it really is time to move away from purely text based input. The GUI can offer so much more including command mapping, colour, highlighting - plus perhaps some of the user interface features that the SmartPhone Generation (anyone under 8) will expect. The FT81x series of ICs offers a really cost effective means of achieving or at least experimenting with these ideas.
 |
| The simulator allows you to quickly and easily build up various GUI screens |
As the SPI interface and control lines between the mcu and the FT812 is just 6 wires plus power, it's fairly easy to hook up to your favourite micro on a breadboard. Hopefully in a few days I will have the FT812 wired up to ChipStick and be able to generate these screens for real. I've been there already with Arduino based hardware - so now it's time for the MSP430 FRAM devices. 8 jumper wires and a LaunchPad should be all that's needed.
In the meantime - if you wish to experiment with the FTDI FT81x Display Simulator application - you can download it from here.
You may also be interested in the othe recent posts on ChipStick
ChipStick - A Diminutive Dev Board
The $5 Forth Computer
First Steps to Building the $5 Computer
Digital Dust
Constructional Guide
Bootloader
Interfacing Memory
I/O Expansion
Graphical User Interface
Applications